
Notice. Wonder. Make: Holiday Landscapes – Stained Glass Trees
Jennifer Roberts, Dec 7, 2021
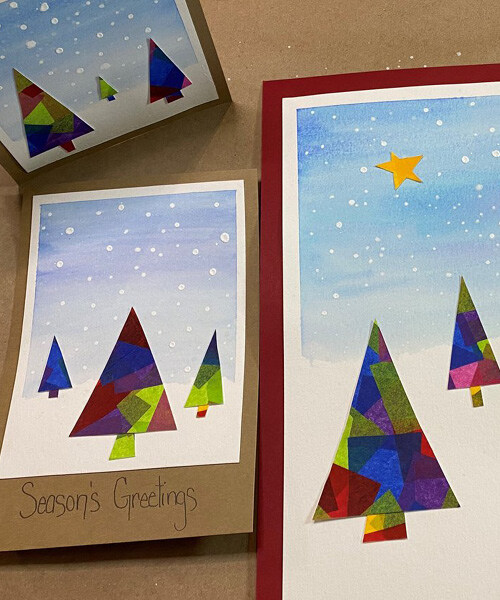
Looking for a seasonal craft that you can do with your family? Maybe you want to create some home crafted gift tags or holiday cards? This stained glass tree project might be just right for you.
This series of fun educational activities and projects aim to help you cultivate curiosity and creativity in your children using arts-based learning, inspired by the same learning techniques and activities used in the award-winning ConocoPhillips Hub for Inspired Learning program. Each activity is designed to be simple, for you to do in your own home and immediate neighbourhood.

SUPPLIES:
-
Water colour paper for the background
-
Water colour paper or white cardstock for the trees
-
Tissue paper cut into squares (as many colours as you like)
-
White glue watered down
-
Brush to spread the watered-down glue
-
Water colour paints
-
Masking Tape or painters tape
-
Water
-
Paint brush
-
Scissors
-
Pencil and eraser
-
White paint or marker
-
Glue stick or double-sided tape
-
Pre-made blank cards or blank cardstock
These supplies can all be found at the Dollar Store, Michaels, or an Art Store of your liking.
INSTRUCTIONS:
Step 1 – Getting the tissue paper down
Using a full piece of water colour paper or cardstock begin to glue down your tissue paper.
-
Try to overlap the tissue paper in a random layout so you get a stainedglass effect
-
Use thin layers of watered-down glue to get your tissue paper to lay flat and not crumpled.
-
Let this dry COMPLETELY!

Step 2 – Creating the background
-
Using the masking/painters tape, tape down your water-coloured paper leaving a ¼” –
-
½” boarder
-
Decide where your horizon will be. You will paint down to that line.
-
Tip: You can use a torn piece of paper, so paint doesn’t go past the mark
-
-
Wet your water colour paper with water where you want the sky
-
Using the water colour paint, create the sky. This technique is called wet-on-wet.
-
Let dry COMPLETELY!
Once step one and step two are COMPLETELY dry, you can move to step three!

Step 3 – Creating the Trees
-
Get you tissue covered paper. Isn’t it beautiful?
-
Turn it over so you see only the back of it
-
On the back draw a variety of triangles. You can play with perspective by making
-
different sizes of triangles
-
Cut out your triangles
-
Cut out small rectangles to be the tree stumps
-
Using a glue stick, glue the tree stumps onto your triangles
-
Ta-Da! Trees!

Step 4 – Prepping your background
-
Slowly pull away the masking tape from your edges
Step 5 – Assemble!
-
Place a few trees onto your background to see where you like them
-
Once you are happy with the placement of the trees, you can glue them down using your glue stick
-
Tips: Keep the trees on or below your horizon line so you don’t have any floating trees!
-
Your trees might be very “thick”. You can use a heavy book to make them lay flat on your background.
-

Step 6 – Finishing details
-
Using a small paint brush or a small round eraser on the end of a pencil, use your white paint to create snow falling

Jennifer Roberts
Jennifer is the Education Coordinator at Arts Commons. Her background in the creative arts allows her access to a diverse set of skills as a Poet, Playwright, Performer, Clown, Mover, Yoga Instructor, and Aesthetic Educator who has a passion for telling stories in surprising ways. Jennifer approaches her craft with great intensity, curiosity and openness and if she can turn something into a collaborative game –– she will!


